
This article is part of a series based on the book Quarkus for Spring Developers.
The Starting Point: Where it all begins
Every journey starts at the beginning. In the Spring ecosystem that starting point is the Spring Initializr; in Quarkus it’s code.quarkus.io. Both aim to help you pick the components for your project, but while they look similar, the concepts of Starter and Extension reflect a fundamental architectural difference.
A Different Mindset: Starter vs Extension
A Spring Boot Starter mainly aggregates dependencies. When the application starts, Spring scans the classpath, reads annotations and builds the dependency-injection context — all at runtime (Runtime).
A Quarkus Extension, however, is split into two parts: a runtime module and an Augmentation (Deployment) module. The real magic happens at build time: the extension scans your code, processes annotations, reads descriptors and leaves everything “pre-chewed” and baked into the bytecode.
As the book emphasizes, the work done at build time is what makes Quarkus extremely fast and memory-efficient, because it removes the need for heavy reflection and runtime scanning during startup.
Equivalence Table
| Quarkus Extension | Spring Boot Starter |
|---|---|
quarkus-resteasy-jackson |
spring-boot-starter-web / spring-boot-starter-webflux |
quarkus-resteasy-reactive-jackson |
spring-boot-starter-web / spring-boot-starter-webflux |
quarkus-hibernate-orm-panache |
spring-boot-starter-data-jpa |
quarkus-hibernate-orm-rest-data-panache |
spring-boot-starter-data-rest |
quarkus-hibernate-reactive-panache |
spring-boot-starter-data-r2dbc |
quarkus-mongodb-panache |
spring-boot-starter-data-mongodb / ...-reactive |
quarkus-hibernate-validator |
spring-boot-starter-validation |
quarkus-qpid-jms |
spring-boot-starter-activemq |
quarkus-artemis-jms |
spring-boot-starter-artemis |
quarkus-cache |
spring-boot-starter-cache |
quarkus-redis-client |
spring-boot-starter-data-redis / ...-reactive |
quarkus-mailer |
spring-boot-starter-mail |
quarkus-quartz |
spring-boot-starter-quartz |
quarkus-oidc |
spring-boot-starter-oauth2-resource-server |
quarkus-oidc-client |
spring-boot-starter-oauth2-client |
quarkus-smallrye-jwt |
spring-boot-starter-security |
Creating an API: code.quarkus.io vs Spring Initializr
If you visit the Quarkus project generator, you’ll notice an option the Spring Initializr doesn’t provide yet: Starter Code. When you pick an extension such as Quarkus REST, Quarkus will generate a working example (GreetingResource.java) so you don’t start from an empty page.
For our example we’ll use that extension — it’s the equivalent of Spring Web.
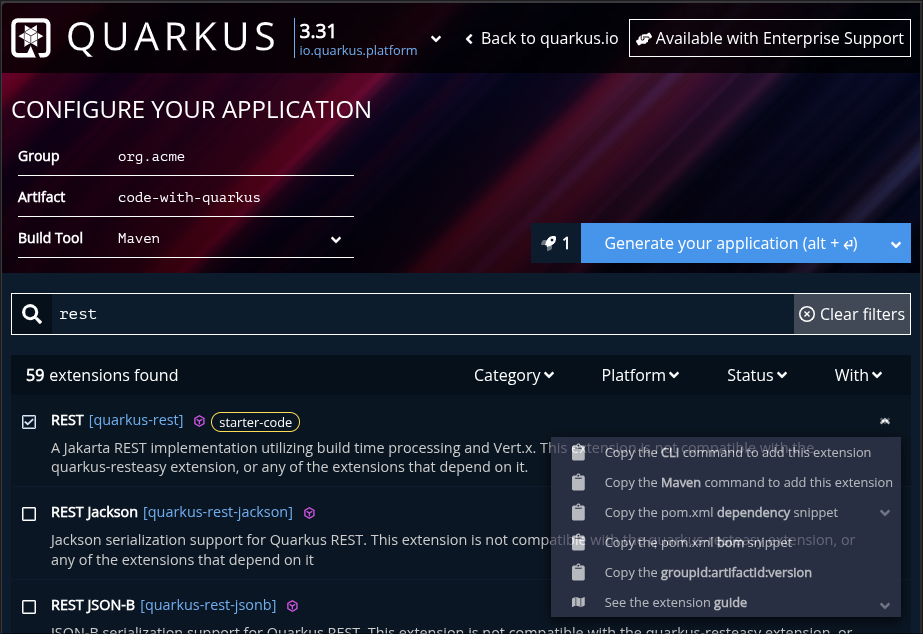
Unlike Spring, code.quarkus.io lets you preview the dependency, see CLI commands for Maven/Quarkus, or even publish the project directly to your GitHub.
This will be your initial Quarkus code:
package org.acme;

import jakarta.ws.rs.GET;
import jakarta.ws.rs.Path;
import jakarta.ws.rs.Produces;
import jakarta.ws.rs.core.MediaType;

@Path("/hello")
public class GreetingResource {

    @GET
    @Produces(MediaType.TEXT_PLAIN)
    public String hello() {
        return "Hello from Quarkus REST";
    }
}
And how does it look on Spring Initializr?
On the Spring side, using the Spring Initializr is what we’re used to: you pick Spring Web, generate the project and download a .zip containing the folder structure and an empty main class.
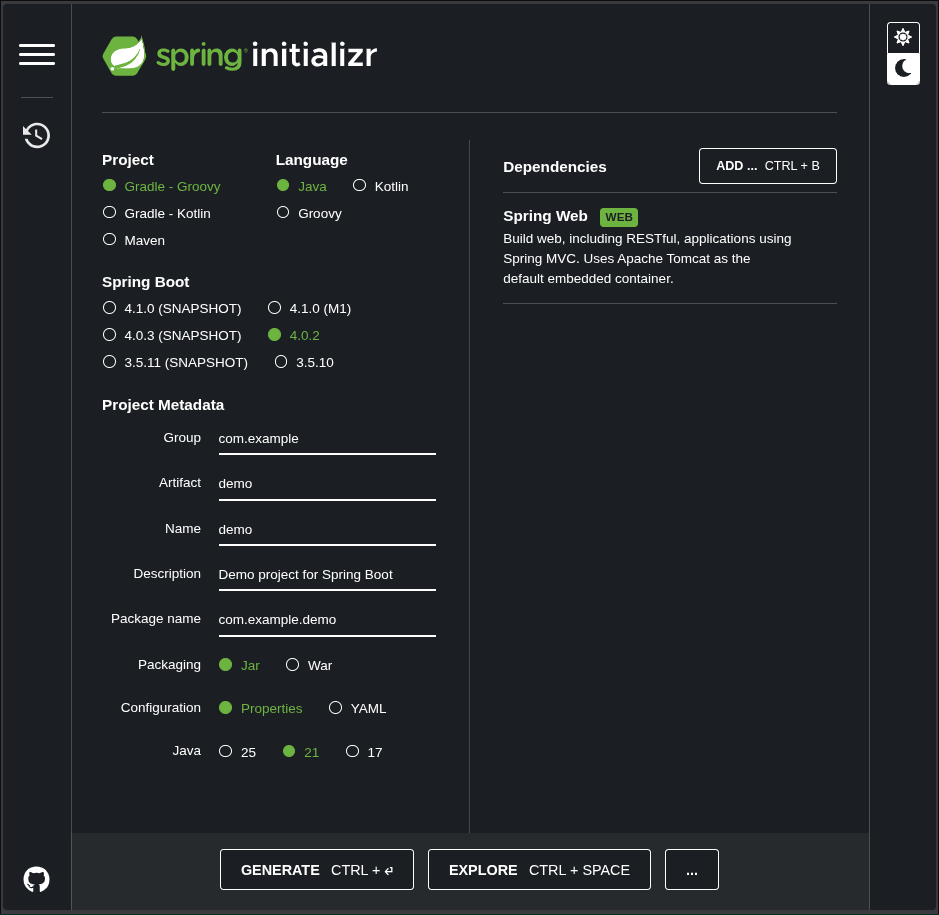
There is no Starter Code concept in Spring Initializr — you create your Controller by hand to get something working. A Spring controller would look like this:
package com.example.demo;

import org.springframework.web.bind.annotation.GetMapping;
import org.springframework.web.bind.annotation.RestController;

@RestController
public class HelloController {

    @GetMapping("/hello")
    public String hello() {
        return "Hello from Spring Web";
    }
}
The reality check: JAX-RS vs Spring Web
Side-by-side the two snippets do the same thing, but the annotations are different. Quarkus uses the Jakarta REST (JAX-RS) standard while Spring uses its own Web annotations.
This is the first notable “accent” change Eric Deandrea highlights in the book: Quarkus moves you closer to Jakarta EE standards while keeping the modern ergonomics Spring developers appreciate.
Anatomy of a Quarkus project: what changes in pom.xml
Version Control: the Quarkus BOM
If you’ve worked with Spring before Spring Boot, you may remember the pain of aligning compatible versions across libraries. Spring Boot solved this with a Parent POM.
Quarkus offers the same convenience using a BOM (Bill of Materials). Instead of inheriting from a parent, you import the quarkus-bom under <dependencyManagement>.
<dependencyManagement>
    <dependencies>
        <dependency>
            <groupId>${quarkus.platform.group-id}</groupId>
            <artifactId>${quarkus.platform.artifact-id}</artifactId>
            <version>${quarkus.platform.version}</version>
            <type>pom</type>
            <scope>import</scope>
        </dependency>
    </dependencies>
</dependencyManagement>
Why is this useful?
When you declare an extension (for example REST) in your <dependencies> you don’t need to specify a version. The BOM ensures the versions used are compatible for that Quarkus release. To upgrade the whole project you change the ${quarkus.platform.version} property at the top of the POM.
Folder structure: practical differences
The folder layout of a Quarkus application is almost identical to Spring Boot, easing the migration path. One notable absence is a Java class with a main method. Spring Boot relies on a class annotated with @SpringBootApplication to bootstrap the container; Quarkus manages startup internally and more efficiently.
| File / Directory | Quarkus description | Spring equivalent or difference |
|---|---|---|
src/main/docker |
Includes ready-made Dockerfiles for JVM and Native builds. | Usually created by the developer from scratch. |
application.properties |
Centralizes configuration in a single file, profiles included. | Often multiple files are used (e.g. application-dev.yml). |
META-INF/resources |
Place for static files (frontend/index). | static or public under resources. |
pom.xml |
Manages extensions and build-time processing. | Manages starters and Spring runtime. |
README.md |
Auto-populated with build and native-image instructions. | Usually contains just the project description. |
Dev Mode: the end of “Wait for Restart”
If there is one feature that captures the joy of developing with Quarkus, it’s Dev Mode. In Spring, even with DevTools it’s common to face slow restarts as a project grows, with the framework banner and logs reappearing each time.
With Quarkus simply run:
./mvnw quarkus:dev
Try live reload now
With Dev Mode running, open localhost:8080/hello.
In your IDE, change the method return to "Hello Quarkus!" and save.
Press F5 in the browser. The change is instant!
The secret to the speed: Restart vs Live Reload
Many Spring developers might think: “Doesn’t Spring DevTools already reload?” The difference is subtle in name but enormous in execution:
- Spring DevTools (Restart): It uses two ClassLoaders. When a file changes Spring discards the app’s class loader and creates a new one. The framework must rebuild the entire context: re-scan annotations, rewire the DI graph and restart the server. It’s an optimized reboot, but still a reboot.
- Quarkus (Live Reload): Thanks to the Build-time architecture we discussed, Quarkus already knows your application’s structure. When you change a class it performs hot-replacement of only the modified bytecode. The JVM process never dies. Quarkus doesn’t need to re-discover endpoints; it surgically updates their behavior.
Dev Services: on-demand infrastructure
If Live Reload handles code changes, Dev Services handles your infrastructure. In Spring you typically need a docker-compose.yaml or a locally installed service for databases (PostgreSQL) or brokers (Kafka).
In Quarkus, if you have Docker (or Podman) available the flow is magical:
- Add the PostgreSQL extension.
- Do not configure a URL in
application.properties. - When running in Dev Mode Quarkus detects the missing configuration and automatically starts a container via Testcontainers for you.
It sets ports and credentials for you. When you stop Dev Mode it cleans up the environment — zero-config developer experience.
Dev UI: your application’s control panel
While Spring Boot gives us Actuator (production-oriented JSON endpoints), Quarkus provides the Dev UI: a developer-friendly interface at http://localhost:8080/q/dev during Dev Mode.
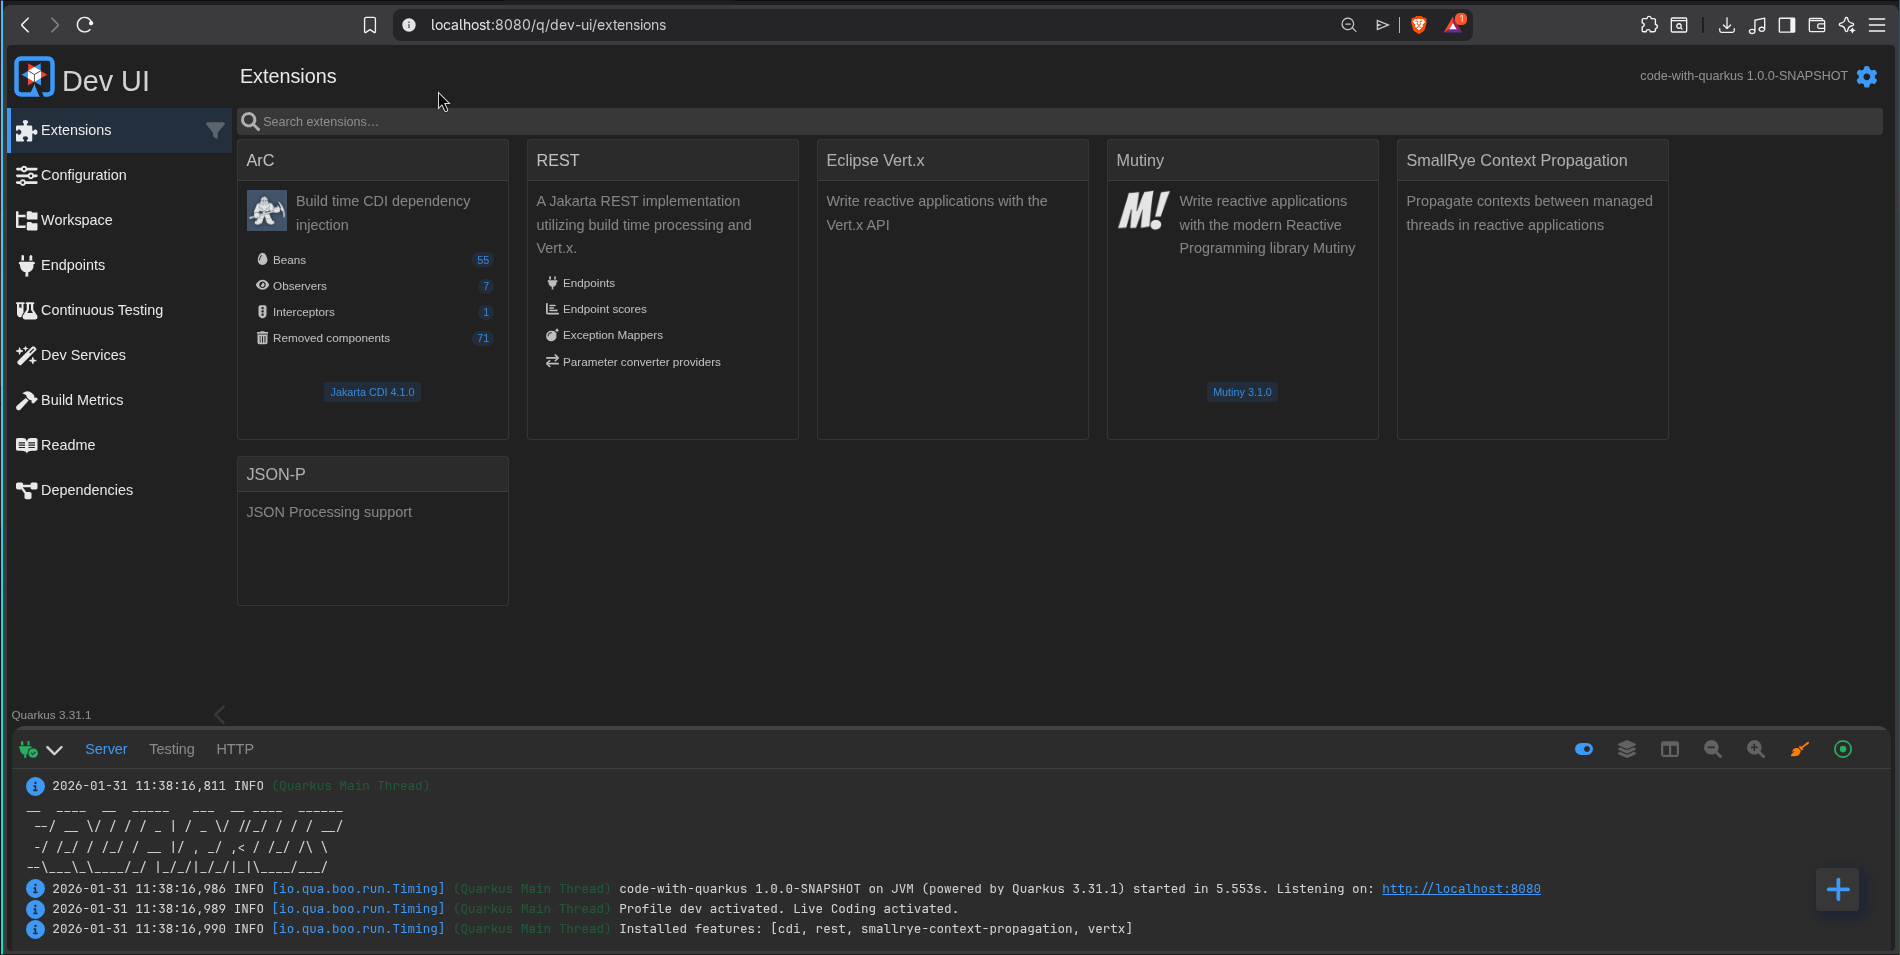
There you can:
- View and exercise all installed extensions.
- Edit
application.propertiesvisually. - Continuous Testing: see unit test status in real time. Pressing
rin the terminal makes Quarkus run affected tests on each save, giving instant feedback if your last change broke anything.
Conclusion
On this first contact we saw that Quarkus does not aim to be “just another framework.” It attacks the root of lost productivity: waiting time. The switch from Spring Web annotations to Jakarta REST is minor compared to the real win — no more waiting for a restart to see your changes.
In the next article we’ll dive into a topic Spring developers love: Dependency Injection (CDI vs Spring DI). We’ll see how @Autowired behaves in the Quarkus world.